
I’ve shared a few tutorials for painting mason jars in the past, but I have mostly stuck to animals: narwhal, panda, sloth, penguin, etc. For Halloween, I thought I would share a spooky painted mason jar tutorial. Making a painted skull mason jar is quick and easy, and you can decorate the painted jar in a number of fun ways!

PAINTED SKULL MASON JAR FOR HALLOWEEN
WHAT YOU NEED TO MAKE A SKULL MASON JAR

I prefer using the Ball Collection Elite 16 ounce jars for projects like these because they have more of a rounded head shape. I also really recommend using FolkArt marbling paint for the inside of the jar. It is the perfect consistency for coating the interior of the jar.
These are all affiliate links, if you make a purchase (of anything from these retailers, not just these items) after clicking through, I will earn a small commission. Ads and affiliate links are the way I am able to keep this website running and to offer you free tutorials all year long. Thank you so much for supporting me and Mad in Crafts!
- Mason jar
- Marbling paint
- Craft paint
- Paintbrushes
- Hot glue (optional)
- Grosgrain ribbon (optional)
- Craft foam (optional)
- Star rhinestones (optional)
- Bling on a roll (optional)
- Faux flowers (optional)
Want to know which craft supplies I always keep in my craft room?
Visit the Mad in Crafts Amazon Storefront to learn more and to buy your own supplies!
HOW TO PAINT A SKELETON MASON JAR
Watch this video to see how to paint a skull mason jar that you can then decorate however you would like. Subscribe to my YouTube channel (IT’S FREE!), for tons of fun content like this!
3 WAYS TO DECORATE A PAINTED SKULL MASON JAR
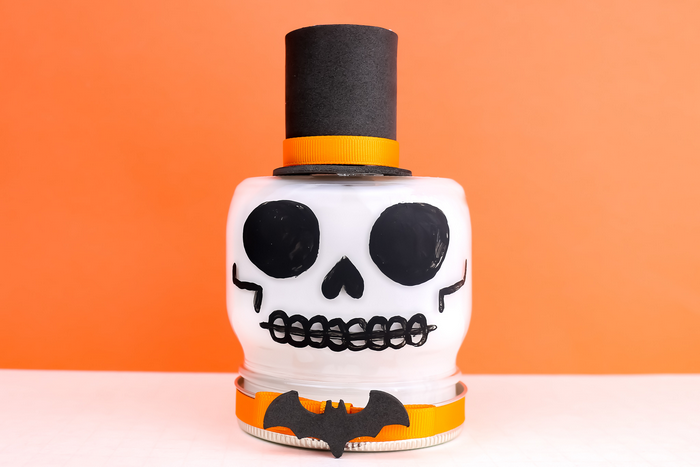
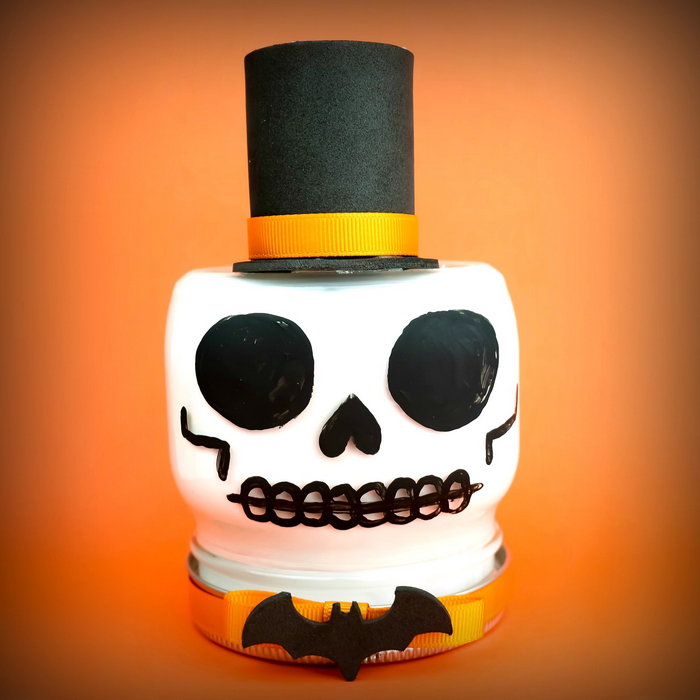
Dapper Skeleton Mason Jar
Equipment
- Marbling paint
- Craft paint
- Paintbrushes
- Hot glue
- Grosgrain ribbon
- craft foam
Instructions
- Coat the inside of the jar with white paint. Allow the excess paint to drain out, and then let the paint dry completely.
- Replace the lid of the jar when the white paint has dried.
- Paint two large black circles to create eye sockets.
- Paint a black upsidedown heart for the nose cavity.
- Paint a thin, black, horizontal line for the mouth and add small arches to be the teeth.
- Paint two brackets to represent the cheekbones.
- After the paint has dried, cut a 4-5 inch length of orange ribbon. Fold each of the two ends back to the middle of the ribbon, and glue into place with hot glue.
- Cut another 1-2 inch piece of ribbon and wrap it around the center of the bow. Secure with hot glue.
- Cut a bat shape out of black craft foam and glue it to the center of the bow.
- Cut enough ribbon to wrap around the perimeter of the jar lid. Glue it in place with hot glue. Add the bow tie with hot glue.
- Cut a 3″ diameter circle, a 5″ diameter circle and a 9 1/2″ x 2″ inch strip out of black craft foam.
- Using hot glue, turn the black craft foam strip into a cylinder. Glue the smaller circle of craft foam to the top of the cylinder. Glue the larger circle to the bottom of the cylinder.
- Cut a 3 1/2″ length of ribbon and glue it to the bottom of the cylinder like a hatband.
- Glue the hat to the top of the painted skull mason jar.

Glamorous Witch Skull Mason Jar
Equipment
- Marbling paint
- Craft paint
- Paintbrushes
- Hot glue
- craft foam
- Star rhinestones
- Bling on a roll
Instructions
- See Steps 1-6 above to create the painted skull jar.
- Cut a 6-inch diameter circle from purple craft foam.
- Cut a large half-circle out of purple craft foam. Roll this half-circle into a cone, and secure the cone with hot glue.
- Glue the cone to the 6-inch circle.
- Cut enough bling on a roll to serve as a hatband for the witch hat and glue it into place.
- Affix star rhinestones with hot glue.
- Cut enough bling on a roll to wrap around the perimeter of the jar lid. Glue it into place.
- Glue the hat onto the top of the skull jar.

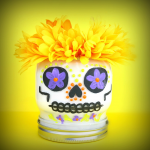
Sugar Skull Mason Jar
Equipment
- Marbling paint
- Craft paint
- Paintbrushes
- Hot glue
- Faux flowers
Instructions
- See Steps 1-6 above to create the painted skull jar.
- Using colorful craft paint, add flowers, leaves, and dots to the skull face. You can refer to images of sugar skulls for reference. (TIP: The end of a paintbrush works well for making paint dots!)
- After this paint has dried, add a crown of yellow flowers to the top of the skull with hot glue.
You might like these other skeleton DIYs:


so cute. I love this idea.