
I love IKEA. We are too far from our closest store for me to make the trip more than once a year, so when I go, I take my time and really soak up all the pretty and inexpensive pieces. My favorite thing about IKEA furniture is that is it all so ripe for alteration. IKEA hacks are nothing new on the interwebs, so I am sure you have seen some inspiring projects along the way. I created this modern IKEA Rast hack using pretty hardware paint, and some fun legs!

I was excited when I was asked to partner up with Menards, Hickory Hardware, and Pittsburgh Paints to create my own IKEA hack. They challenged me to take a plain Jane RAST dresser and turn it into something fabulous. I used paint and new hardware to give the boring dresser a thoroughly modern makeover.
MODERN IKEA RAST HACK
ASSEMBLING THE IKEA RAST

I assembled the RAST according to the cartoony instructions that come with any IKEA purchase. I know I am the odd man out, but I love assembling IKEA furniture. All the fun of building something with none of the math. That’s my sweet spot.
I did alter the RAST just a bit since I wanted to give the bulky dresser a lighter appearance by setting it up on legs. Out of the box, these IKEA dressers don’t have a bottom; it has the four sides, a top, and drawers. Before I added the front apron piece (the cross piece under the drawers) I needed to give the dresser a bottom.

I raided my wood stash for a few 1x3s and cut them to size. I used wood screws to install each piece of wood to the sides of the dresser, about an inch up from the bottom of the apron piece. That way the apron on the bottom of the dresser hides the brackets into which the legs are screwed. This gives the piece a more finished look.

I bought the table legs and brackets at Menards, and they are an inexpensive way to completely change the look of a piece. My store carried the legs in 6”, 8”, and 12” inch styles. I chose the 12” to give the dresser maximum height. I also chose the straight leg brackets, as opposed to the angled leg brackets. Angled legs would have given it a bit more of a retro look than I was going for, but still would have been very pretty.
I primed the legs and then gave them a coat of brass gilding so they would have a strong gold color that was just a bit reflective. I think this is a nice marriage of glam and vintage that really adds to the look of the piece.
NOTE: The dresser is sturdy enough that it will stand up just fine on its own, but if you live in a home with pets or kids, PLEASE take the time to use the included wall mount kit to secure the dresser to the wall behind it.
THINGS TO KNOW ABOUT OIL-BASED FURNITURE PAINT

While I was at Menards, I picked up a quart of Pittsburgh Paint’s Trim, Door, and Furniture paint in Antique White, and an oil-based primer. While this is a very pretty white paint color, I did have a bit of a learning curve using the oil-based paints.
A few things I learned about oil paint:
- Once you paint a piece with oil paint, it is difficult to paint over it with anything other than oil paint. You can do it; it will just take extra effort.
- Oil paint is a beast on your brushes. I hate post-project clean-up, so I bought a few brushes that I just threw out after I was done using them. Yes, I’m lazy. No, I don’t care.
- Oil paint self-levels like a boss. Even if there are still some brushstrokes left in the paint after application, as it dries those brushstrokes will fade right out. That is why it is a great choice if you are looking for a glossy, lacquer-like finish.
- Oil paint holds up really well. I haven’t really used the dresser long enough to test this for myself, but my reading has told me that oil paint cures to a super durable finish that is perfect for furniture that will see a lot of use.
PAINTING AND DECORATING AN IKEA RAST DRESSER

One of my favorite projects I have ever shared on Mad in Crafts is my Designer-Inspired Nail Head Table. I have seen dressers in similar styles in many designer home catalogs, so I figured I would repeat that look for this hack.

I used Hickory Hardware’s nails to create the nail head trim around the perimeter of the dresser. Since the wood is soft pine, the nails tapped into the wood without too much trouble. I planned out my design so the nails are spaced every 1 1/2”. If it wouldn’t have been 90 degrees and 90% humidity while I was working, the whole process would have been easy as pie!

Lastly, I added the drawer hardware from Hickory Hardware. Since I had already filled in and painted over the existing hardware holes, I had to drill new holes for these pulls. I made a simple template with painter’s tape and used my Dremel to create the holes. The pulls are about 5” hole-to-hole, so they are sturdy and substantial for these larger drawers.

The drawers pull out to reveal two last design details. I painted the sides and interiors of the drawers with gold spray paint. They now have a pretty shimmer of gold when I open a drawer.

I lined the bottoms of each drawer with modern gold and white faux bois paper and Mod Podged it down. You could also use pretty wallpaper to line the drawers.
WHAT YOU NEED FOR THIS IKEA RAST DRESSER HACK

I am definitely biased, but I really think that the dresser is completely transformed. When it is finished, it can be used as a dresser, a side table, or a nightstand in a room where you need a little extra storage space.
This is also a great beginner DIY project because you don’t need to use many power tools to finish it. If you ask nicely, you might even get a worker at the hardware store to rip the 1x3s down to size for you, and then you only need a drill or Dremel to put it all together.
Source list (some are affiliate links):
You might like these other furniture DIYs:
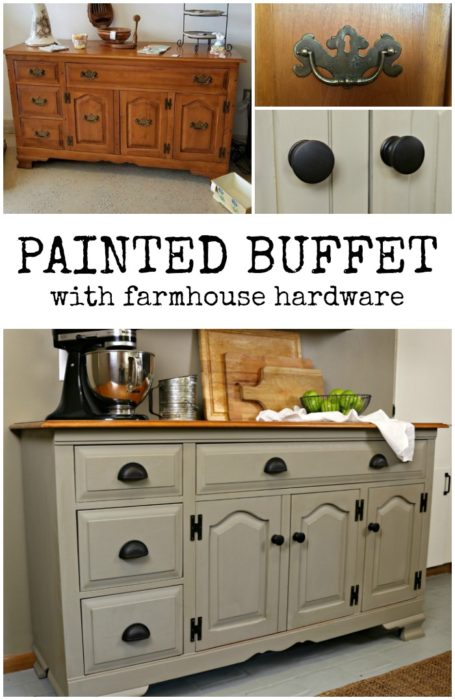
PAINTED FARMHOUSE BUFFET MAKEOVER


LOVE this! Such an amazing transformation!
Thank you so much!!!
Love it! Great makeover . . . and I really love the lining in the drawers!
I\’m running out of that paper! I hope I can find more because I love it.
I’d feel more confident in the dresser if you used a more robust way to attach the crossmembers for the legs. Either metal brackets, or wooden blocks below the crossmembers would be much stronger than screwing into the end grain of 1×3’s !
Otherwise, pretty cool transformation of a very basic dresser! I like the touch of spray painting the insides gold, to make it “pop” when you open the drawers.
It’s a shame you don’t have a donate button! I’d certainly donate
to this excellent blog! I suppose for now i’ll settle for bookmarking and
adding your RSS feed to my Google account. I look forward to fresh updates and will share this site with my Facebook group.
Chat soon!