Mad in Crafts

  • Email
  • Facebook
  • Instagram
  • LinkedIn
  • Pinterest
  • Twitter
  • YouTube
  • Home
  • About
    • ABOUT JESSICA
    • CONTACT
    • MEDIA KIT
    • Seen On
  • PRIVACY
  • CRAFTS
    • HOLIDAY
      • VALENTINE’S DAY
      • ST. PATRICK’S DAY
      • EASTER
      • FOURTH OF JULY
      • FALL
      • HALLOWEEN
      • THANKSGIVING
      • CHRISTMAS
    • HOME DECOR
    • KIDS
    • MISC
    • Wearable
      • JEWELRY
      • PURSES, CLUTCHES AND TOTE BAGS
      • T-SHIRTS
    • FREE PRINTABLES
    • FREE SVGs
  • DIY
    • Gardening
    • Health
    • ORGANIZATION
    • Outdoor
    • Room Makeover
    • The Mad House
  • Recipes
    • Dessert
    • DINNER
    • DRINKS
    • Snacks and Appetizers
  • ENTERTAINING
    • Birthday Party
    • Party
    • Wedding
  • SHOP
Please note: This page may contain affiliate links. If you click a link and choose to make a purchase from the partnership site, I will earn a commission. Thank you for supporting Mad in Crafts!

West Elm Inspired Perforated Globe Pendant Lamp

April 4, 2013 by madincrafts 29 Comments

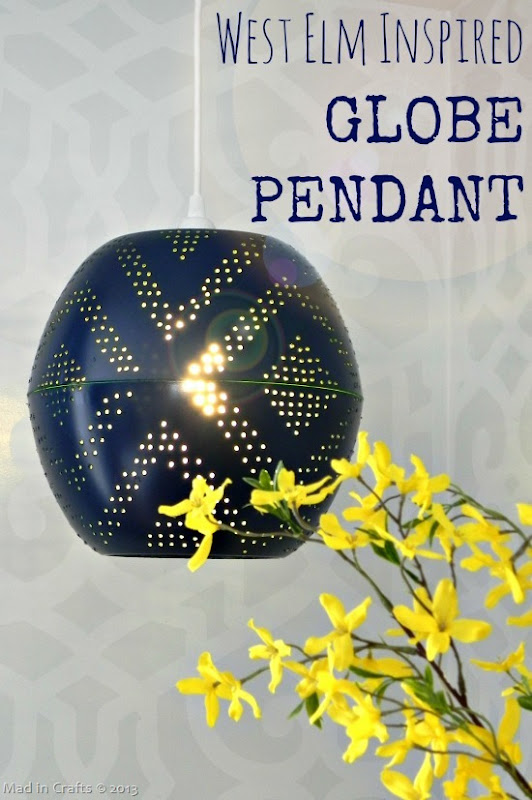
West Elm Inspired Globe Pendant

 
Yesterday I showed you my new dining room wall art, an Anthro knock-off plate collage.  That corner of my dining room wasn’t the only one to get a designer-inspired upgrade recently.   I was inspired by this West Elm Perforated Globe Pendant and thought I could make a simpler DIY version. It would give me a chance to give my Dremel a real workout.
 

NOTE: Since this was a complete experiment I went through the steps of the project in a very inefficient way.  I will show you the steps in the order you SHOULD do them, just don’t be thrown off if the pictures don’t look like they are in chronological order.

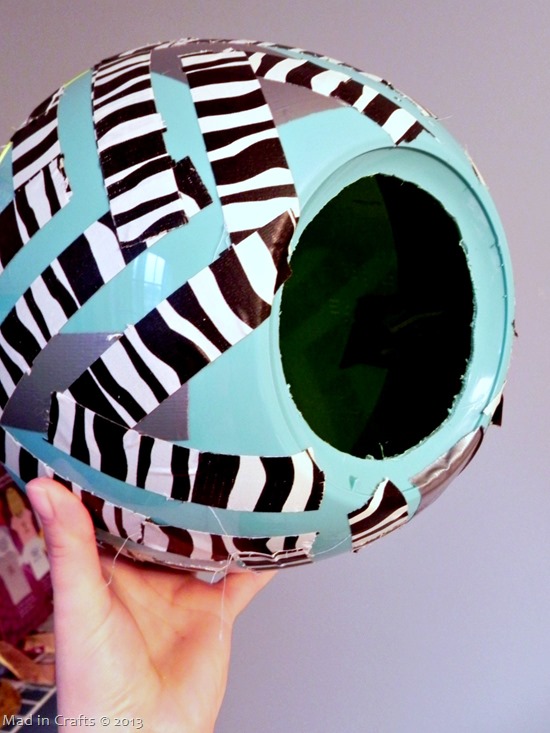
Pendant Lamp Bottom

For this project, you need two large plastic bowls that are the same size, so that when you put them together they make a large sphere.  It’s best if the plastic is somewhat rigid, not rubbery, because it will be easier  to work with.  Cut a large hole in the bottom of one bowl with tin snips and round it out using the sanding band attachment on a Dremel.  Cut a smaller hole in the bottom of the second bowl so it is just large enough to accommodate your lamp kit.  Run a line of E-6000 glue along the lip of one bowl, and set the other bowl down on top of it to make a sphere.  Use duct tape to keep the bowls together.  Let the glue cure overnight.

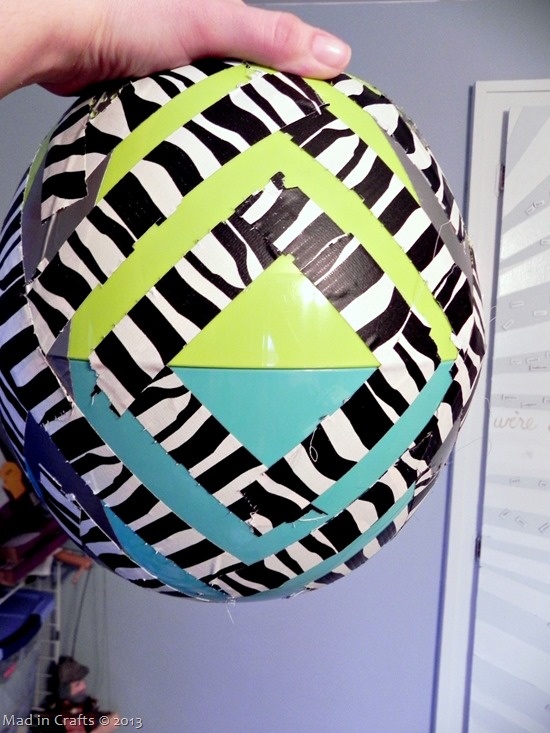
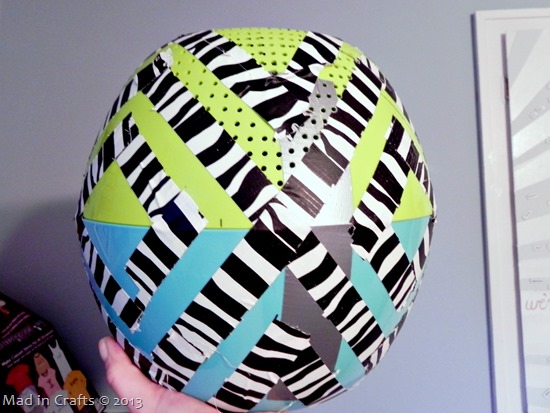
Tape Off Pattern

After the glue has cured, create your geometric pattern with strips of duct tape torn in half length-wise.  I used cheapo Dollar Tree duct tape because the adhesive is not as strong as Duck Tape and will come off more easily.  Painter’s tape won’t work well for this project because it will peel off the plastic too easily.

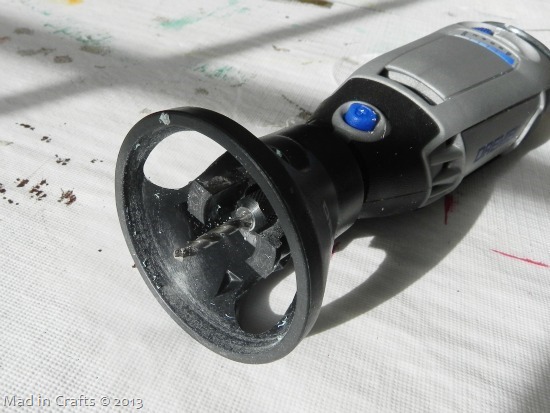
Dremel with Guide

Set up your Dremel with the largest drill bit and the depth guide set to about a half inch.  The depth guide will just keep you from going crazy with the Dremel and creating wonky holes.  I found that having my Dremel set at 6 was the perfect speed for creating the holes.  Anything slower than that, and it wouldn’t drill through.  Anything higher, and it would begin to melt the plastic around the hole.

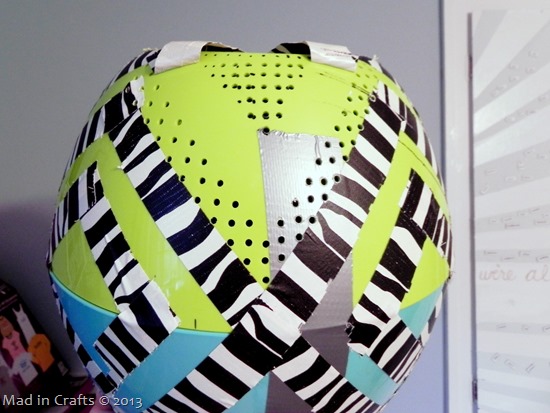
Dremel in Pattern

Start drilling!  The Dremel makes the process unbelievably quick.  I initially thought that I would have to mark off where each hole would go, but that would have taken WAY too long.   I just eyeballed the spacing as  I went and attempted to keep the holes straight.  The perforations on the inspiration piece aren’t perfectly spaced either, so I wasn’t too concerned with perfection.

Remove Tape to Reveal Pattern

When I peeled back the tape, the hole pattern was revealed!  Keep drilling hundreds more holes.

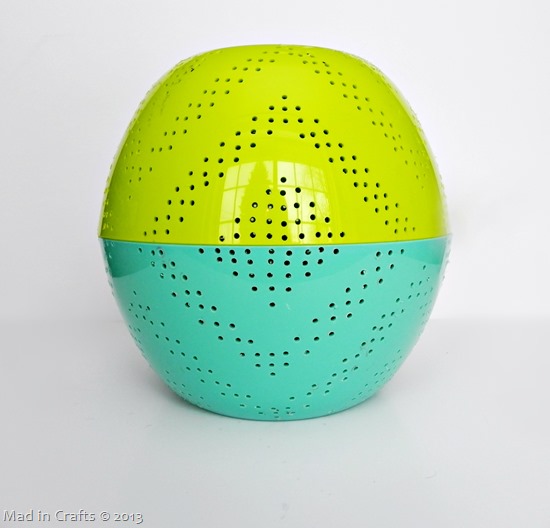
Finished Pendant Pattern

This what it looked like after all the drilling was done and the tape was removed.  Pretty nifty as it was, but not what you would call sophisticated.  Nothing a little spray paint wouldn’t solve.

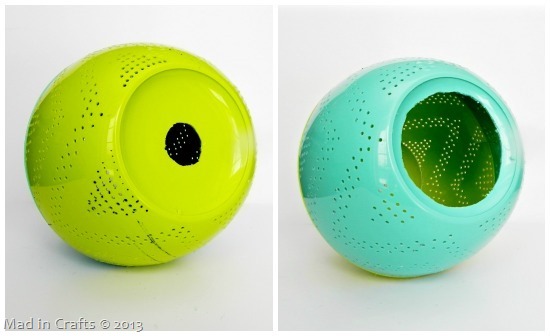
top and bottom of pendant

Just for reference, this is what the top and bottom of the pendant looked like before painting.

Painting Rig

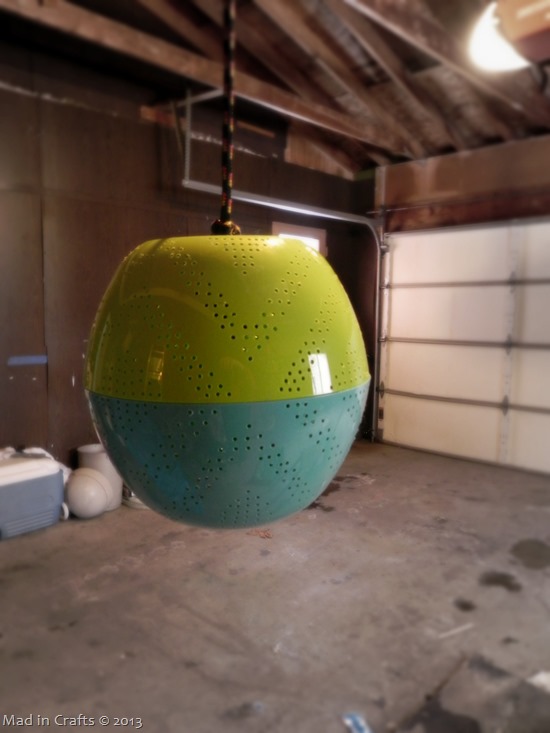
I rigged up a way to hang the pendant in the garage so I could paint from all angles.

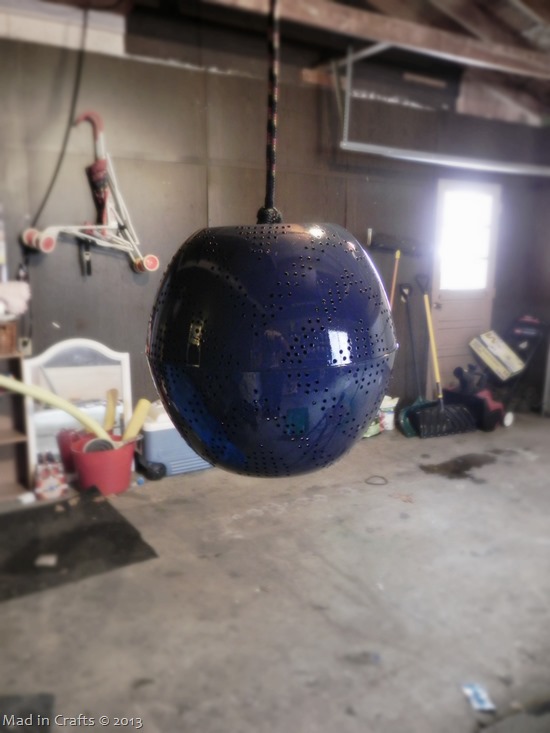
Painted Pendant Lamp


Please don’t judge my garage.

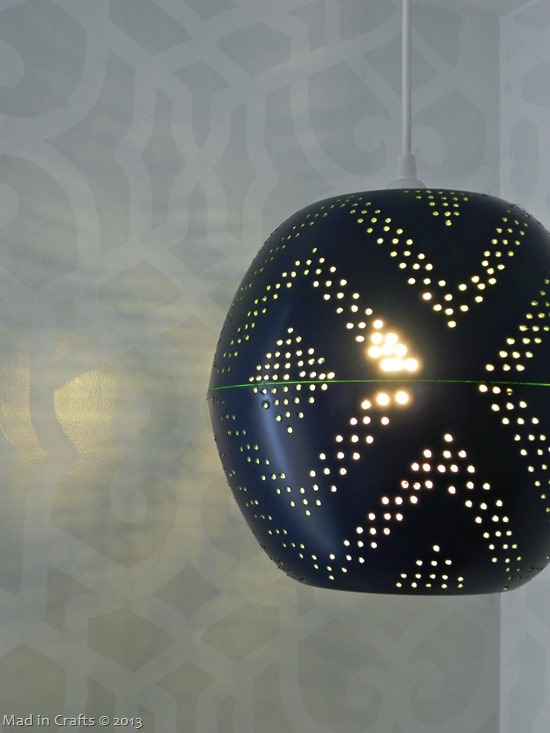
Then I hit it with a few coats of Valspar Navy Satin paint.   I debated between the navy and using my trusty ORB (to mimic the inspiration piece), but I just couldn’t get the idea of a sleek navy pendant light out of my head.  In the end, I am glad I went with the blue because it fits in so nicely with our home.

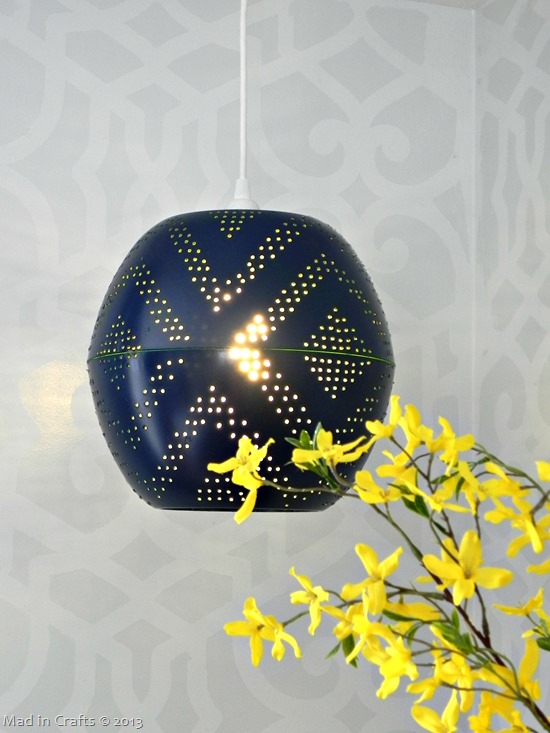
lamp1

I threaded the lamp kit into place and plugged it in.  Success!

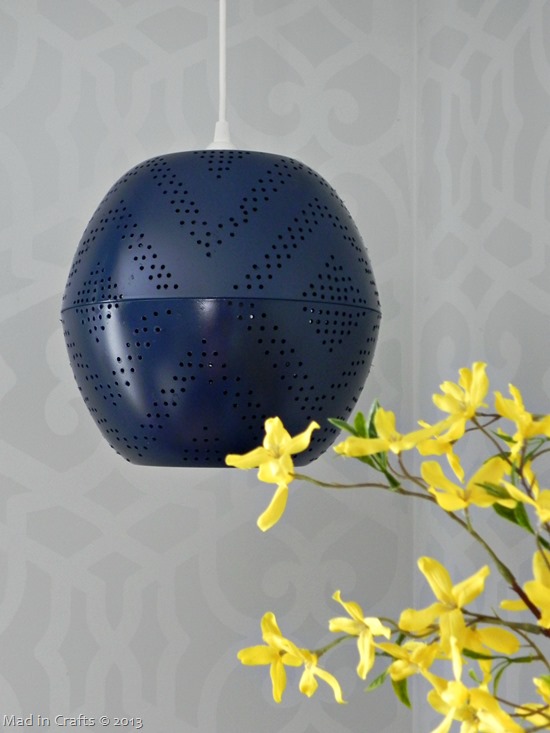
lamp2

The pendant even looks snazzy when the light is off.

West Elm Inspired Pendant Lamp

I haven’t decided if the pendant will have a permanent home in our blue, yellow, and grey dining room or if I will move it out to our sun porch (that hopefully will get a makeover this summer).  But for the cost of a few plastic bowls and a lamp kit, we know have a chic hanging accent light that looks much more expensive than it is!
 
These are all affiliate links, if you make a purchase (of anything from these retailers, not just these items) after clicking through, I will earn a small commission. Ads and affiliate links are the way I am able to keep this website running and to offer you free tutorials all year long. Thank you so much for supporting me and Mad in Crafts!
  • two large plastic bowls (the same size)
  • tin snips
  • E-6000
  • cheap duct tape
  • Dremel variable speed rotary tool
  • Dremel sanding bands
  • Dremel drill bits
  • Dremel cutting guide
  • spray paint
  • pendant lamp kit
  • light bulb

You might like these other Dremel projects:

BRIGHT SPRING TRAY

COLORFUL TRAY MAKEOVER

SPRAY PAINTING A PICKET FENCE

HOW TO SPRAY PAINT A FENCE

Filed Under: Home Decor, Spray Paint Tagged With: affiliate, DIY, knockoff, lamp, lighting, pendant lamp, tutorial

Share on Facebook
Facebook
Pin on Pinterest
Pinterest
Tweet about this on Twitter
Twitter
Share on LinkedIn
Linkedin
              

Comments

  1. Anna says

    July 18, 2014 at 1:14 am

    Hello!!

    Loooove this DIY and am planning on doing some similar ones in the future! I was wondering, though, if there was a certain type of lightbulb you suggest so it won’t melt the plastic. Thanks so much for sharing!!

    Anna

    Reply
    • madincrafts says

      July 18, 2014 at 1:56 am

      Thanks so much! I generally use fluorescent bulbs these days, and they don't give off much heat. Plus, the drilled holes do vent the fixture a bit. Hope this helps!

      Reply
  2. Roopini says

    August 25, 2014 at 5:45 pm

    Wow! That is so beautiful. I am inspired. Pinning it 🙂

    Roopini

    Let’s Make It Lovely

    Reply
  3. Una says

    October 17, 2015 at 10:18 pm

    Coolest part is the original color glows when the light is on giving the fixture a lot of unexpected depth. Great work.

    Reply
  4. Lori Bryan says

    February 25, 2018 at 3:01 pm

    How cute! I am going to attempt this, I have the light above the kitchen sink, “painted with a mixture of decoupage glue and craft paint” but as much as I use the light it’s fading. this will be sooo much better! But I do have a question , you mentioned that ure space is grey, do you mind telling me the color of grey? I have been searching high and low for as neutral as I can get color for the kitchen ceiling, I have about a dozen samples taped between the wall and the ceiling, it’s so hard to make that decision, I don’t want to go to dark but now so light it looks white. The color grey you have does any blue,green or brown hues come out strongly in it?

    Reply
    • madincrafts says

      February 25, 2018 at 11:25 pm

      I have two different grey paints on the wall in there. The darker background color is Ace Royal Willow Lake and the lighter grey is Ace Royal Wishing Star. They are both pretty neutral grey colors, maybe skewing very slightly blue. Thanks for the comment!

      Reply

Trackbacks

  1. Faça você mesmo - 10 luminárias | Simples Decoracao | Simples Decoração says:
    March 24, 2015 at 12:20 am

    […] A moça aqui usou 2 bowls (aqueles recipientes de cozinha) de plástico e fez os furinhos. Funciona tbém com 2 escorredores de plástico já cheios de furinhos, o que diminui o trabalho, né ? E qto mais furinho, mais bonito. O cuidado é sempre não usar lâmpadas quentes ao fazer estas luminárias usando plástico, ok? […]

    Reply
  2. West Elm Inspired Perforated Globe Light - Copycat Crafts says:
    September 16, 2015 at 6:59 pm

    […] LINK: West Elm Inspired Perforated Globe […]

    Reply
  3. 20 DIY Pendant Lighs - Unexpected Elegance says:
    January 20, 2017 at 2:00 pm

    […] West Elm Inspired Perforated Globe Pendant Lamp from madincrafts.com […]

    Reply
  4. What She Does With Something She Found At The Dollar Store Will Impress You - The How-To Zone says:
    April 24, 2017 at 5:32 pm

    […] 19. Drill holes in two bowls, glue them together, and you’ve got this beauty! […]

    Reply
  5. 22 DIY Lamp Revamps - A Little Craft in Your Day says:
    May 30, 2017 at 5:05 pm

    […] Wrapped Lampshade  3. Elegant Pink Bow Lamp 4. Rope Lamp  5. Lightbulb Doodle Pendant 6. Globe Lamp 7. Tu-Tu Lamp  8. Straws Lampshade  9. Wall Lamp  10. Geometric Chipboard […]

    Reply
  6. 17 Inspiring & Affordable DIY Lighting Ideas | Designer Trapped says:
    July 7, 2017 at 1:21 pm

    […] West Elm Inspired Globe Pendant Lamp by Mad in […]

    Reply
  7. 15 Delightful DIY Lighting Ideas You Will Want In Your Home - The Veranda of ideas says:
    July 19, 2017 at 8:48 am

    […] Tutorial […]

    Reply
  8. 15 Delightful DIY Lighting Ideas You Will Want In Your Home - Home Decor says:
    July 19, 2017 at 9:15 am

    […] Tutorial […]

    Reply
  9. What She Does With Something She Found At The Dollar Store Will Impress You - ViralCurb.Club says:
    October 2, 2017 at 8:49 am

    […] 19. Drill holes in two bowls, glue them together, and you’ve got this beauty! […]

    Reply
  10. 15 Ingenious DIY Mood Lighting Ideas - DIY Community says:
    October 17, 2017 at 10:54 am

    […] image via mad in crafts […]

    Reply
  11. 33 DIY Lamps and Chandeliers Lighting Up Your Home With Glory! says:
    March 8, 2018 at 9:34 am

    […] DIY Details : madincrafts […]

    Reply
  12. What She Does With Something She Found At The Dollar Store Will Impress You - Viral Info says:
    July 4, 2018 at 6:12 pm

    […] 19. Drill holes in two bowls, glue them together, and you’ve got this beauty! […]

    Reply
  13. How To Light Up Boring Lampshades: 15 DIY Ideas - Style Motivation says:
    January 5, 2019 at 11:23 pm

    […] West Elm Inspired Lampshade from Mad in Crafts   […]

    Reply
  14. 17 Inspiring & Affordable DIY Lighting Ideas | Designertrapped.com says:
    April 14, 2019 at 7:23 pm

    […] West Elm Inspired Globe Pendant Lamp by Mad in […]

    Reply
  15. 15 DIY Lamp Shade Tutorials says:
    May 10, 2019 at 4:39 pm

    […] Mad in Crafts […]

    Reply
  16. DIY Lighting Projects - DIY Led Lighting Ideas - DIY Crafti says:
    February 25, 2020 at 4:24 am

    […] Instruction: madincrafts […]

    Reply
  17. 41 Easy Creative DIY Lamp and Lampshade Ideas says:
    March 9, 2020 at 10:10 pm

    […] Tutorial: madincrafts.com […]

    Reply
  18. 100 DIY Pendant Light Projects to Make Your Home Decoration Easy says:
    April 4, 2020 at 12:46 pm

    […] Using easily accessible things at home like plastic bowls, duct tape, spray paint etc you can craft this awesome globe pendant and add some peak style value to your home decor especially to a particular section of the house. Grab full details here madincrafts […]

    Reply
  19. 200 Cheap And Easy Dollar Store Crafts That You can DIY ⋆ DIY Crafts says:
    April 4, 2020 at 12:47 pm

    […] You can really make expensive looking knock offs at home using the dollar store items and we would like to explain it more with this example of perforated globe pendant lamp, a West Elm inspired lamp that is made of a dollar store plastic bowls, glued together to make a globe and comes with a light bulb inside! Full project details here madincrafts […]

    Reply
  20. 45 DIY Lampshade Ideas – The Best And The Brightest – Shawnee KS Homes and Lifestyle says:
    May 15, 2020 at 3:30 pm

    […] need a drill and you’ll also require a rotary tool to cut out the out on the bottom. Check out madincrafts to see the complete […]

    Reply
  21. 15 DIY Lamp Shade Tutorials that Bring Brightness to your Home - Diy Crafts Projects 2020 |Track Zik says:
    July 25, 2020 at 9:23 am

    […] ourselves in a more DIY way! This fantastic perforated West Elm pendant lamp cover tutorial from Mad in Crafts is the perfect example of what we […]

    Reply
  22. 5 Creative DIY Lampshades – azndo says:
    December 11, 2020 at 3:20 pm

    […] via madincrafts.com Would you have guessed that this stylish lampshade is made with two salad bowls. It takes a bit more time to build but by following this excellent step-by-step tutorial you can get this project done quickly. Make sure to use plastic salad bowls plastic that are more rigid, not rubbery, because it will be easier  to work with. […]

    Reply
  23. 30 Beautiful DIY Lampshade Plans & Ideas says:
    January 26, 2021 at 3:58 am

    […] See Plan […]

    Reply

Leave a Reply Cancel reply

Your email address will not be published. Required fields are marked *

Recipe Rating


About Jessica

Search the blog…

Gallery of Valentine's Day Crafts
DIY Home Organization
Delicious Dessert Recipes

Copyright

You're welcome to link to Mad in Crafts or use a single image with a brief description to link back to any post. Republishing posts in their entirety is prohibited. Feel free to pin on Pinterest!

Affiliate Disclosure

Jessica Hill is a participant in the Amazon Services LLC Associates Program, an affiliate advertising program designed to provide a means for sites to earn advertising fees by advertising and linking to Amazon.com

Copyright © 2021 · Metro Pro Theme on Genesis Framework · WordPress · Log in

We use cookies to ensure that we give you the best experience on our website. If you continue to use this site we will assume that you are happy with it.Ok