Mad in Crafts

  • Email
  • Facebook
  • Instagram
  • LinkedIn
  • Pinterest
  • Twitter
  • YouTube
  • Home
  • About
    • ABOUT JESSICA
    • CONTACT
    • MEDIA KIT
    • Seen On
  • PRIVACY
  • CRAFTS
    • HOLIDAY
      • VALENTINE’S DAY
      • ST. PATRICK’S DAY
      • EASTER
      • FOURTH OF JULY
      • FALL
      • HALLOWEEN
      • THANKSGIVING
      • CHRISTMAS
    • HOME DECOR
    • KIDS
    • MISC
    • Wearable
      • JEWELRY
      • PURSES, CLUTCHES AND TOTE BAGS
      • T-SHIRTS
    • FREE PRINTABLES
    • FREE SVGs
  • DIY
    • Gardening
    • Health
    • ORGANIZATION
    • Outdoor
    • Room Makeover
    • The Mad House
  • Recipes
    • Dessert
    • DINNER
    • DRINKS
    • Snacks and Appetizers
  • ENTERTAINING
    • Birthday Party
    • Party
    • Wedding
  • SHOP
Please note: This page may contain affiliate links. If you click a link and choose to make a purchase from the partnership site, I will earn a commission. Thank you for supporting Mad in Crafts!

Royal Design Studio: Chez Sheik Stenciled Dining Room

June 13, 2012 by madincrafts 10 Comments

STENCILED DINING ROOM
 
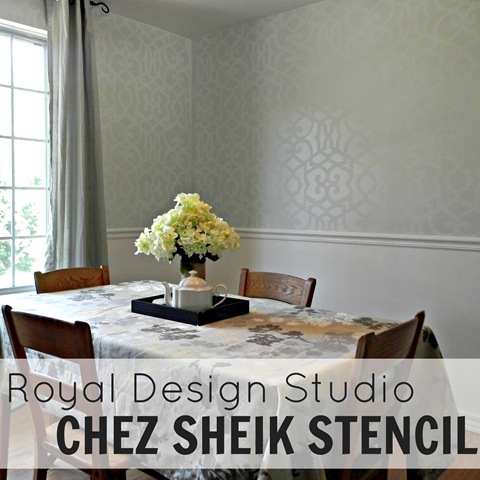
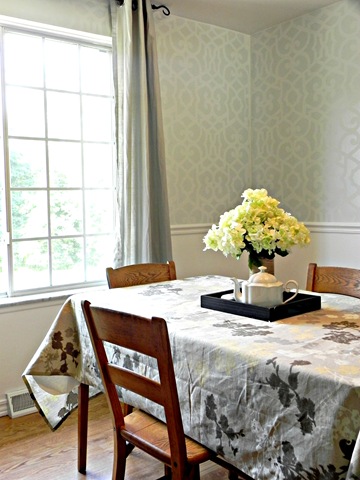
Let me introduce you to my favorite room in The Mad House.  Though it’s not finished yet, the walls alone are enough to make me love it most. Isn’t it gorgeous?
 
I was able to try out the Chez Sheik stencil (affiliate) from Royal Design Studios to create this allover look on my dining room walls.  The stencil was easy to use and produced amazing results, even though I was a first-time stencil user.
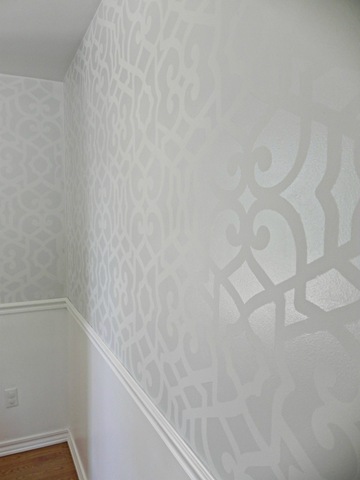
 
I kept the stencil above the dining room chair rail, but I stenciled all four walls.  Even though I did this stencil project myself, it only took me one afternoon to complete.  I just followed the instructions for using an allover stencil on the Royal Design Studio site, except that I used a small, foam roller instead of a stencil brush.  I was pleasantly surprised with how easy it was.
 
royal design studio stencilled wall
 
My dad and I first painted above the chair rail using a light grey paint in a matte finish.  The matte finish slightly speeds up the drying time of the stencil and provides a good contrast for the stencil paint.  With the stencil, I used a semi-gloss paint that was one shade darker on the same paint chip as the matte grey.  I love the way the semi-gloss catches the light.
 
royal design studio stencil
 
Although there isn’t much contrast in paint color between the two grey paints, the difference in the finishes creates a sophisticated and subtle look.  And I love it.
 
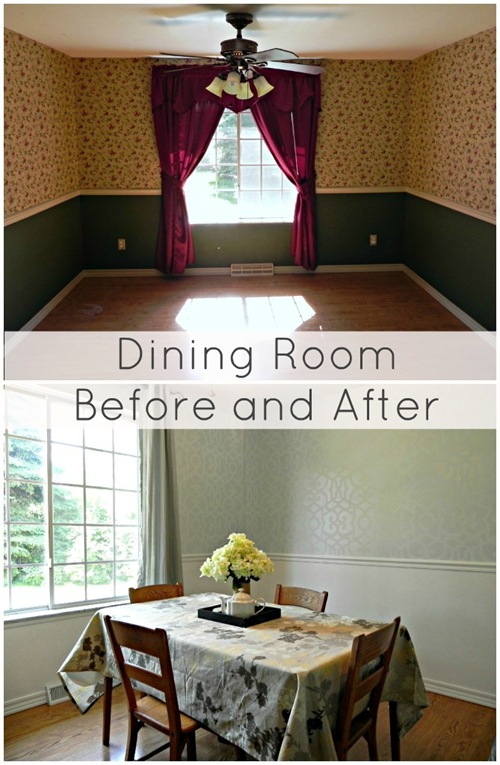
Just for fun, let’s take a look at the before and after of our dining room.
 
stenciled dining room before and after
 
Better, yes?
 
If you are excited to try out a stencil in YOUR home, keep an eye on the blog.  I have a delightful surprise for you coming up!
 
I received this complimentary product for my honest review.  I was not otherwise compensated for this post.  All opinions are 100% my own.

Filed Under: Room Makeover Tagged With: affiliate, dining room, home decor, paint, reveal, room makeover, stencil, tutorial

Share on Facebook
Facebook
Pin on Pinterest
Pinterest
Tweet about this on Twitter
Twitter
Share on LinkedIn
Linkedin
              

Comments

  1. Jessica Stafiej says

    June 16, 2014 at 11:21 pm

    What was the name of the colors you used on this stenciled wall?

    Reply
    • madincrafts says

      June 17, 2014 at 3:18 am

      I used Ace Royal's Wishing Star D38-1 for the lighter shade in gloss and Willow Lake D38-2 for the base using flat paint.

      Reply
  2. Oum Oukkâcha says

    June 26, 2014 at 10:20 am

    I love is so beautifull andthe grey is good color , is class ♥

    Reply
  3. Anne says

    June 11, 2015 at 3:16 pm

    Did you use the large size or the pro size stencil?

    Reply
    • madincrafts says

      June 11, 2015 at 8:14 pm

      I believe it was the just the large size. I don't think they carried the Pro size then.

      Reply
  4. Bell says

    November 18, 2015 at 7:20 pm

    Did you use a matte paint for the stencil?

    Reply
    • madincrafts says

      November 18, 2015 at 8:49 pm

      I used the flat paint all over the wall. Then I used a gloss finish with the stencil.

      Reply
  5. Skylar says

    January 9, 2016 at 12:03 am

    Are your walls textured?

    Reply

Trackbacks

  1. 25 Snazzy Stencil Projects | Girl in the Garage says:
    October 22, 2014 at 4:08 pm

    […] 25.  Stenciled Dining Room – Mad in Crafts […]

    Reply
  2. Entryway Wall - Four Design Options - Addicted 2 Decorating® says:
    July 7, 2015 at 2:38 pm

    […] via Mad In Crafts […]

    Reply

Leave a Reply Cancel reply

Your email address will not be published. Required fields are marked *

Recipe Rating


About Jessica

Search the blog…

Gallery of Valentine's Day Crafts
DIY Home Organization
Delicious Dessert Recipes

Copyright

You're welcome to link to Mad in Crafts or use a single image with a brief description to link back to any post. Republishing posts in their entirety is prohibited. Feel free to pin on Pinterest!

Affiliate Disclosure

Jessica Hill is a participant in the Amazon Services LLC Associates Program, an affiliate advertising program designed to provide a means for sites to earn advertising fees by advertising and linking to Amazon.com

Copyright © 2021 · Metro Pro Theme on Genesis Framework · WordPress · Log in

We use cookies to ensure that we give you the best experience on our website. If you continue to use this site we will assume that you are happy with it.Ok