I have wanted to make a hummingbird feeder ever since Allie linked this project up to my Mad Skills Party last year! I thought a wine bottle feeder was such a creative and inexpensive way to attract some lovely wildlife to our yard.
After doing lots of research and asking bothersome questions of other people who have hummingbird feeders, I decided on my own prototype.
To make a wine bottle hummingbird feeder, you will need:
an empty wine bottle
red paint (if the wine bottle isn’t red)
small bowl with a plastic, snap-on lid
heavy gauge wire
craft knife
awl or screwdriver
saucepan
water
white sugar
In my research, I found out that hummingbirds LOVE the color red. For some reason, it attracts them more than any other color. If you take a look at store-bought hummingbird feeders, most of them are primarily red.I decided that it would be very cool if the wine bottle I used for my feeder was red. Cool, yes. Easy to find, no.
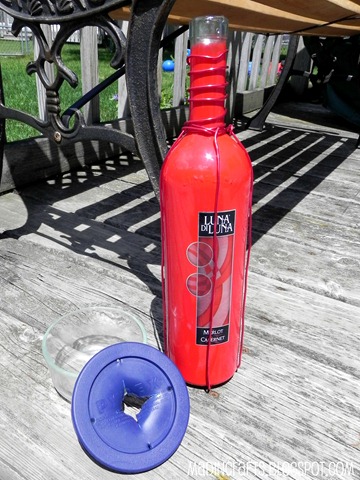
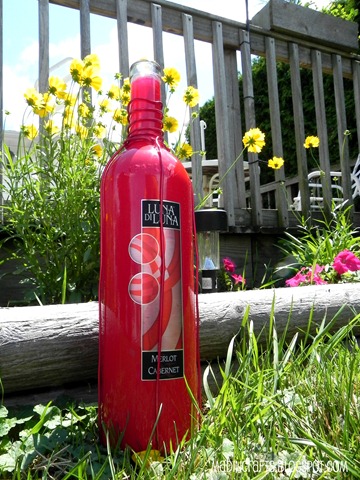
It took me a lot of Googling and looking around at stores before I found a bottle that was ACTUALLY red, not clear with red wine in it. This Luna di Luna comes in a red bottle, and the wine is actually quite tasty. But, take that opinion with a grain of salt, because I am definitely a beer girl.
If you can’t find an actually-red wine bottle, you can always paint your bottle red or leave it clear or blue or green or… you get the picture.
I used heavy gauge decorative floral wire (also reddish) from Dollar Tree. It took exactly one package of the stuff (6 ft.) to securely wrap the bottle.
I wrapped the wire around the base of the bottle neck, up over the base of the bottle, down and around the neck again, back over the base of the bottle, and finished by wrapping the wire around the neck again a bunch of times.
If you wrap the wire across the base of the bottle in one direction on the first pass, and then wrap the second pass perpendicular to that, you will have a handy little X on the bottom of the bottle from which you can hang the feeder later.
I hope that makes sense to you because I don’t have any pictures to explain it. 
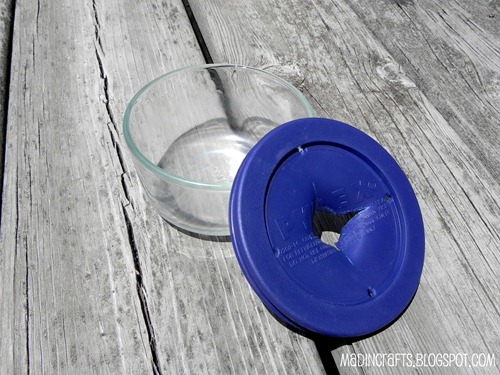
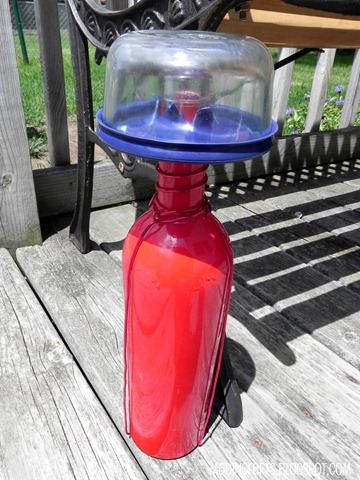
Time to make the feeding station. You will need a bowl with a PLASTIC lid that SNAPS TIGHTLY onto the bowl. I don’t care if the bowl itself is glass or plastic or fine china, as long as the lid is plastic and snug.
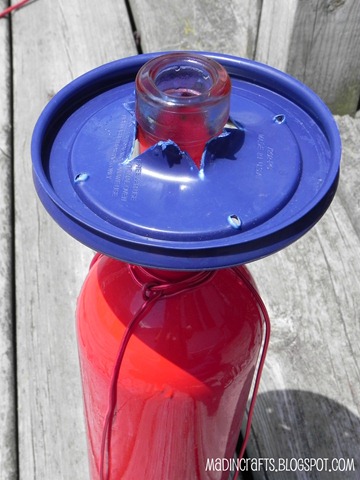
Use a craft knife to cut an X in the middle of the plastic lid. The objective is to make an opening large enough that the neck of the wine bottle fits in, but only just.
Use an awl or a screwdriver to make several holes along the edge of the lid. These will be the holes the hummingbirds will use to get at their food.
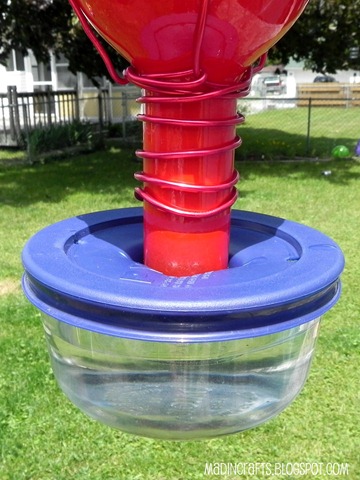
See how the bottle just barely fits thru the X in the middle of the lid? That will assure that the bowl doesn’t fall off when the feeder is hung.
Fill the bottle with hummingbird nectar made of water and sugar. From what I have read, a 4:1 water to sugar ratio is common, but if you live in a very hot climate you can cut the sugar back to a 5:1 or 6:1 ratio. The nectar won’t spoil as quickly this way.
Simply mix the water and sugar in a saucepan, bring it to a boil, and let it cool before pouring the homemade nectar into the bottle.
Then, snap the bowl back onto the lid.
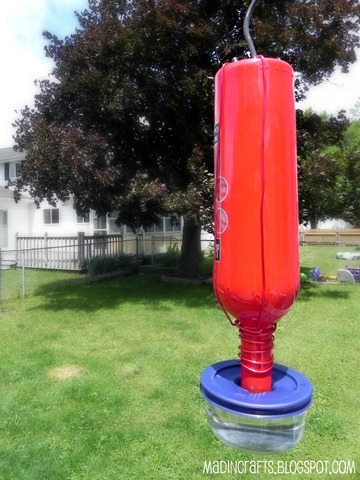
When you invert the feeder to hang it, the nectar will pour into the bowl, but only up to the lip of the wine bottle. There is some scientific principle being demonstrated here, but I was an English major and have no idea which one it is.
If you have the inclination, you can add some fake flowers to the feeding holes on the bowl. Some websites say that this is another way to attract hummingbirds. I might make some flowers out of plastic bottles like Bethany did for her wreath. They would stand up to the elements better than silk flowers I would think.
Hang your feeder up where it can be seen from a window and wait for the hungry little beauties to show up for lunch!
HUMMINGBIRD FEEDER: Part Deux
After having the feeder up for a few days, I went to check the nectar levels… and found a revolting surprise.
Ants. Lots of ants.
Big ones.
They had marched up the shepherd’s hook and down the length of the wine bottle to their (sugar) watery grave. It was so unsettling, that night I had nightmares that ants had overrun my whole house. I woke up itching.
I am not sure how it is in your neck of the woods, but here in Michigan the ants have been out of control this summer. If my dog leaves behind one piece of dog food, in half an hour there will be a few dozen ants swarming it. I am not a fan.
I took the feeder down, hosed it out, and pouted. My poor, lovely hummingbird project. How could I share it with you readers if I knew the design was a flop?
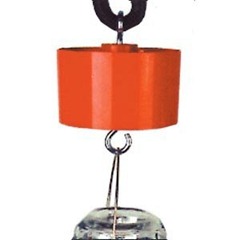
So, I did what I always do. I hopped on the interwebs and researched it. To my relief, ants are a common problem with hummingbird feeders, so much so that a specific product can be bought to deal with them. Here is what a store-bought ant trap looks like:
Basically, the ant trap is a bowl with hole in the middle. A hook hangs from the shepherd’s hook down through the hole and attaches to the feeder. The bowl, when you fill it with water, acts as a moat. When then ants crawl down toward the feeder, they drown in the moat first!
Ant traps for hummingbird feeders aren’t expensive, but Cheapy Cheaperson knew I could make one… for free.
The trick is that you can’t just make a DIY ant trap out of any old bowl. If you were to drill a hole in a regular bowl and add water, the water would all come out the hole. I might be an English major, but I recognize gravity when I see it.
I knew I would need a bowl-like container, that had a sort of inner bowl to prevent the water from leaking out of the hole. Where had I seen something like that before? Where?
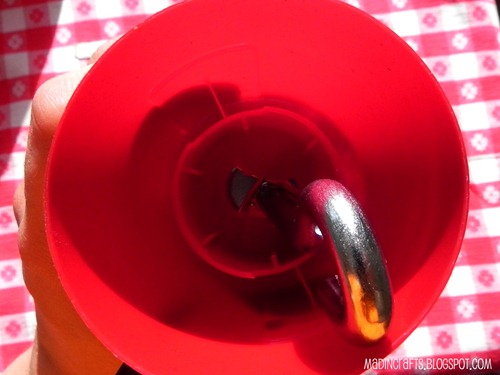
Here is my DIY hummingbird feeder ant trap. Can you guess what I used (without cheating and looking at the next picture)?
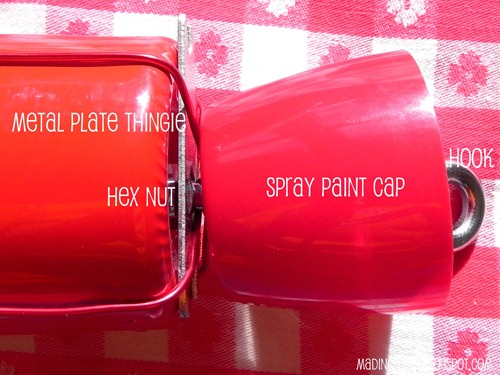
It’s a spray paint can cap! And it’s even red! Thank you again, Krylon!
I busted a hole in the center of the spray paint cap and inserted a metal hook with a long threaded post. I used a hex nut to attach a metal plate thingie (technical term) that happened to be in my tool box to the threaded hook. I wedged that under the floral wire and bibbidy bobbidy boo! ANT TRAP!
If you don’t have these particular bits of hardware, you could use more floral wire or a chain to hang the ant trap, I would imagine.
I rehung my feeder and added water to the moat. It may not keep the Black Knight at bay, but it should work for those pesky ants.
I have to say, I was pretty smug with myself for having figured out how to make my own ant trap. I may or may not have facebooked my mom to tell her.
It’s not as elegant looking as it was without the ant trap, but I will sacrifice a little elegance to have nightmare-free sleep.
And, you wanna know the best part? If you count the wine bottle as recycled materials, the total cost of this project – $1.
HUMMINGBIRD FEEDER: I Still Know What You Did Last Summer
So this getting ridiculous. I went to check on my my oh-so-clever ant trap, only to find my sugar water bowl full of giant dead ants. Ugh.
It seems like these tenacious Michigan black ants formed some sort of human ant bridge over the moat, sacrificing a few of their brethren for the sake of the community, to get down to the feeder. Their organizational skills are both admirable and terrifying.
Anyway, after more Googling and frustrated muttering, I decided to try another interwebs idea: cooking spray on the shepherd’s hook. Apparently this makes the pole too slippery for the ants to climb, and they slide down like so many hazed freshmen.
So far it has been working, but at this point I would not be surprised to walk outside to find that those industrious, little pests had constructed some kind of elaborate scaffolding system to get to the feeder.
At which point I will pack up and move.
TIPS FOR FEEDING HUMMINGBIRDS:
1. DO NOT add red food dye to the nectar. People used to think this attracted the birds, but it is not healthy for them to ingest the dyes.2. Clean your feeder and change out the nectar weekly. Sugar water can grow all sorts of unhealthy stuff if it sits for too long.3. If possible, place your feeder in a shady, sheltered spot. The hummingbirds will feel more secure there and are more likely to visit.4. Be patient! It will take a while for the hummingbirds to find your feeder and a bit longer to get the courage to approach. Eventually you will get some hummingbirds and possibly orioles too!5. Put your feeder out in early Spring and leave it out for 2 weeks after you have seen your last hummingbird.






Ants are a huge pain in Virginia as well. Glad you found the cooking spray trick…I've had store bought and homemade moats, but cooking spray works the best. Neat project!
We get a ton of "hummies" in AZ here's another tip, put the feeder in a place near flowers they like variety apparently LOL. And don't be disappointed if you only only get one or two per feeder, hummies are very territorial and chase other off their food supply. I have one that literally sits on the feeder. If you want a lot try a feeder in the front yard and one in the back love the little guys they are super cute
Great post – I love honesty in crafting! I hope the ants have not evolved agian and started building a condo on your property.
liberally coat a section of the shepherds hook with good old vaseline and the ants won't climb over it. S
This is one of the most entertaining DIY articles I've read in a long time ! All that fuss for little bittie birds and wee nasty bugs ! Good project at the same time.
Great suggestion! Love the comments and journey thru success. I will have to try it.
Oh my gosh! I have just read what seems to be a hundred DIY hummingbird feeder how-to's and this post is BY FAR the BEST one! If I try it out, I'll definitely link over to you!
Gotta say, this is hilarious! I live in Michigan too & the ants are bad again this year! Stinkin' ants! I got attacked by some when I was trying to plant some flower bulbs out front over the weekend… grrrr!
I use stuff out of my hubby's garage, I think it is axle grease or something! Ants hate it! will not go near the stuff. Okay so the wire the feeder is hanging from is not so pretty, but NO nasty ants!
Just as a suggestion for others. For an ant trap you could try a small bowl (red if you like) drill a hole in the center large enough for your hook/chain/whatever to fit tightly. Once you know it will all fit and work the way you like fill around the hook/chain/whatever with silicon and let it dry for at least a few hours (a full day is best) and then the space for ants to drown would be larger and harder for them to gap, you can fill it up higher, and no leaking! Good luck! I will be trying this myself soon!
If you grease the area where you don’t want the ants with vaseline all your problems will be solved. they will not even cross the barrier where there is vaseline.
I tried that and they still managed to get up the pole. These are some kind of engineered Super Ants, I'm telling you! 😛 Thanks for the tip, though!